Introduction
A common way for children’s apps to teach letters is to have someone draw
the letter, the app tracking the user’s drawing. For this article, we’ll
implement this functionality by subclassing UIView, adding features
incrementally, adding tests, managing Cocoapod dependencies, and using
fastlane. You can follow along using the source code on
GitHub. Along the way, I’ve added links to
git tags, pointers to the code at specific points in time.
Touches
There are several UIView callbacks which deal with users touching the view.
override func touchesBegan(_ touches: Set<UITouch>, with event: UIEvent?)
override func touchesMoved(_ touches: Set<UITouch>, with event: UIEvent?)
override func touchesEnded(_ touches: Set<UITouch>, with event: UIEvent?)
When we detect that someone has moved their touch, we can grab the list of
touches, which includes the current and previous position of the touch.
We’ll store those in a struct Line.
struct Line {
    let start: CGPoint
    let end: CGPoint
}
Then, we’ll draw these lines in the the UIView’s draw call. The drawing
functionality is similar to other drawing APIs like HTML canvas.
override func draw(_ rect: CGRect) {
    lines.forEach(drawLine)
}

private func drawLine(line: Line) {
    guard let context = UIGraphicsGetCurrentContext() else {
        print("ERROR: no context available")
        return
    }
    context.move(to: line.start)
    context.addLine(to: line.end)
    context.setStrokeColor(UIColor.black.cgColor)
    context.strokePath()
    UIGraphicsEndImageContext()
}
Out of Bounds
We want to implement a feature where a user has to follow a particular path. If the user goes beyond some threshold of this path, then we want to detect that in order to give the user some sort of indication.
There are at least two ways we can implement this:
- We can allow the user to draw as long as any point drawn is within a threshold from any point in the expected path.
- We can track the progress of the user as they draw, and note which points on the expected path have been drawn, and require that the user continue on the path. In this way, we only need to check parts of the expected path that we have not drawn yet.
We’ll implement #1 first since it is simpler.
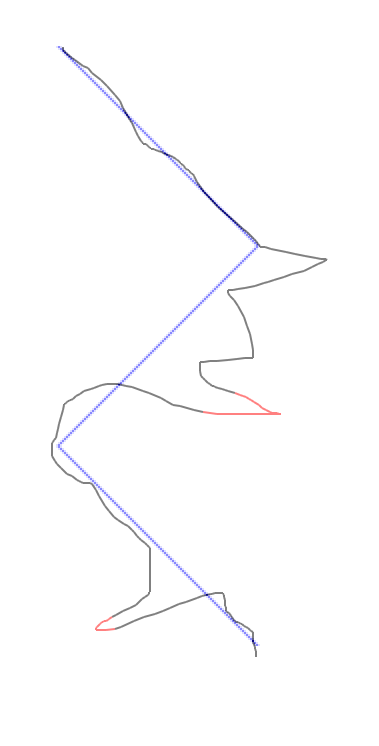
To implement this, we’ll first need to accept some expected path. Although we may want smooth paths at some point using bezier paths, we’ll keep things simple and only support straight lines between segments. We’ll display the path under our drawing to guide our touch. Since this expected path won’t change, we’ll draw this on an image. We’ll display the image on an image view behind our drawing.
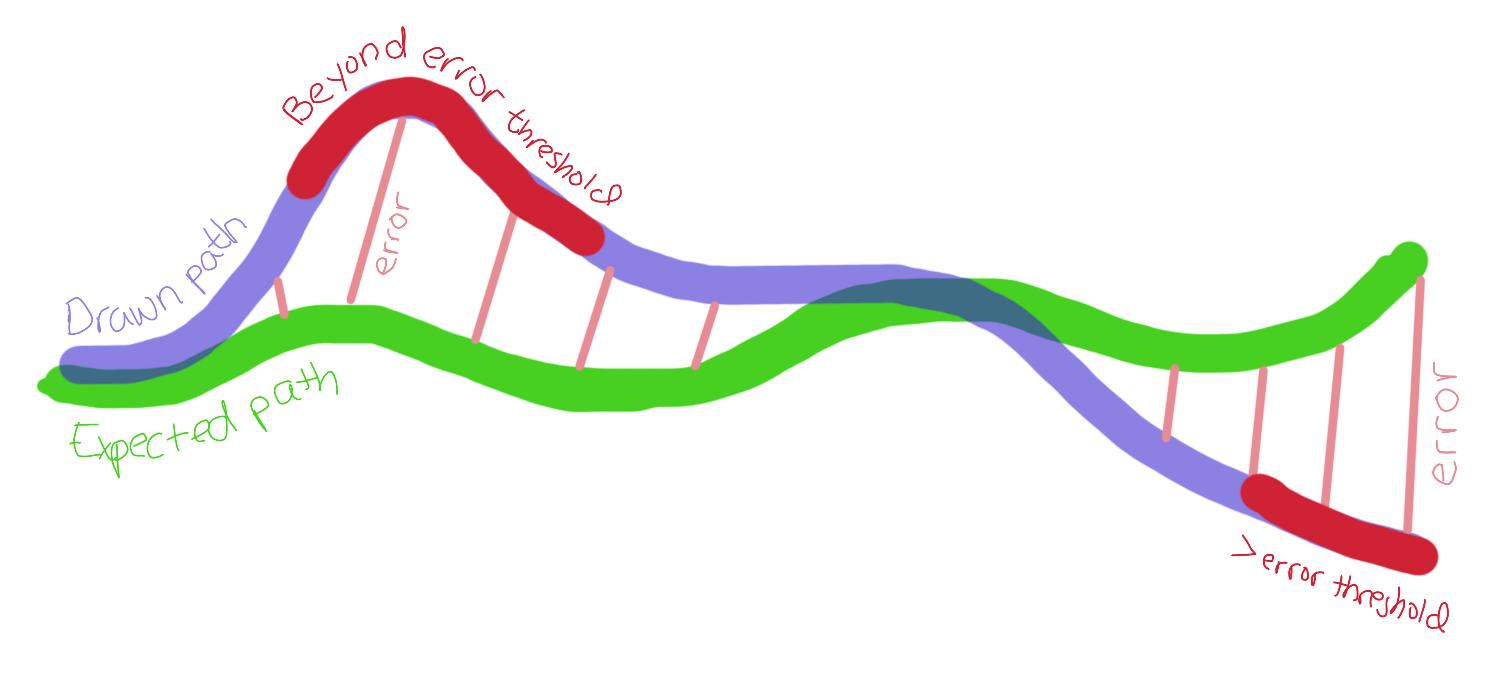
Next, when we draw, we will compare the points we draw, and calculate the distance from each of the points in the expected path. This is fairly inefficient but there are ways of making it quicker. One way is to partition the space into a set of areas and note which points in the expected path fall into these areas. (Related to BSP.) For now, we will just use the trivial method of doing this. If the line that we draw is beyond some threshold distance from the closest point on the expected path, then we will give some indication (by drawing the line red).
We create a property that will draw the expected path on the image associated
with a UIImageView when it is set.
var expectedPath: Array<CGPoint> {
    get { return _expectedPath }
    set {
        _expectedPath = newValue
        drawExpectedPath(points: newValue)
    }
}

private func drawExpectedPath(points: Array<CGPoint>) {
    UIGraphicsBeginImageContext(expectedPathView.bounds.size)

    guard var last = points.first,
        let context = UIGraphicsGetCurrentContext() else {
        print("There should be at least one point")
        return
    }

    context.setFillColor(UIColor.white.cgColor)
    context.fill(expectedPathView.bounds)

    context.setStrokeColor(UIColor.blue.cgColor)
    points[1..<points.count].forEach { pt in
        context.move(to: last)
        context.addLine(to: pt)
        context.strokePath()
        last = pt
    }

    let image = UIGraphicsGetImageFromCurrentImageContext()
    UIGraphicsEndImageContext()
    expectedPathView.image = image
}
We change the touchesMoved call to note the color that should be used for the
line. Black if the line is valid and red if invalid. We’ll add a property in
the Line struct to hold the color as well.
override func touchesMoved(_ touches: Set<UITouch>, with event: UIEvent?) {
    touches.forEach {
        let start = $0.previousLocation(in: self)
        let end = $0.location(in: self)
        let color = colorForPoints(start, end)
        self.lines.append(Line(start: start, end: end, color: color))
    }
    setNeedsDisplay()
}
colorForPoints just checks if both of the line’s points are within some
threshold of any of the points in the expected path, returning black if so, and
otherwise red.
private func colorForPoints(_ pts: CGPoint...) -> CGColor {
    if pts.allSatisfy(isPointWithinBounds) {
        return UIColor.black.cgColor
    }

    return UIColor.red.cgColor
}

private func isPointWithinBounds(_ pt: CGPoint) -> Bool {
    let threshold: CGFloat = 75
    return expectedPath.contains { ept in
        let dx = pt.x - ept.x
        let dy = pt.y - ept.y
        let distance = sqrt(dx * dx + dy * dy)
        return distance < threshold
    }
}
Refining Features
Although we’ve made good progress, this is somewhat unimpressive. There are two problems.
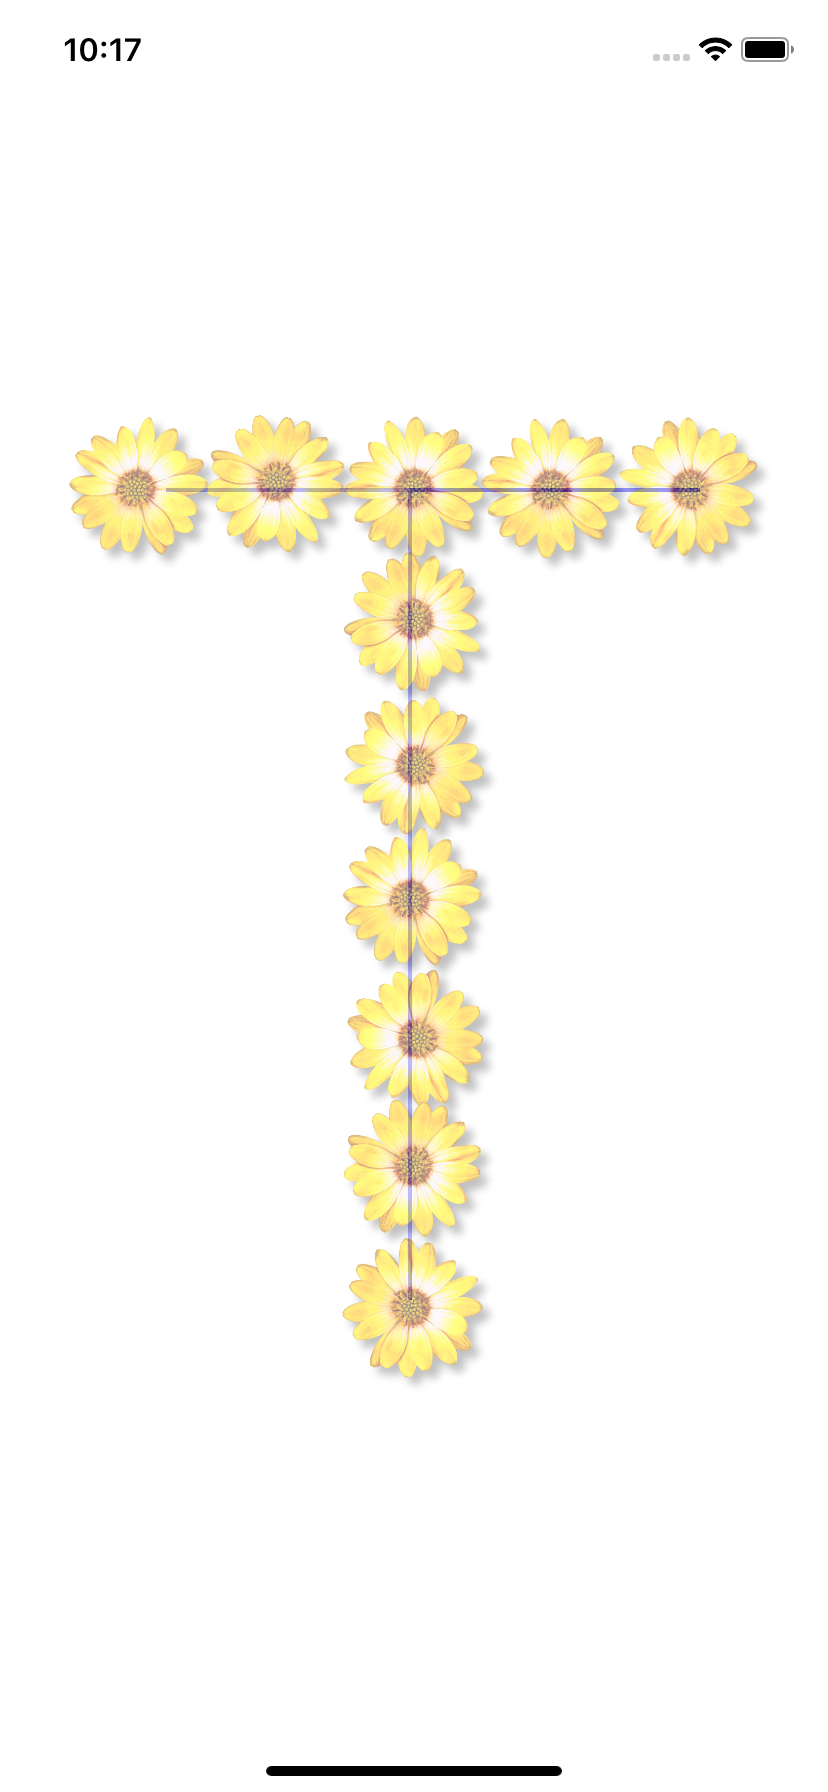
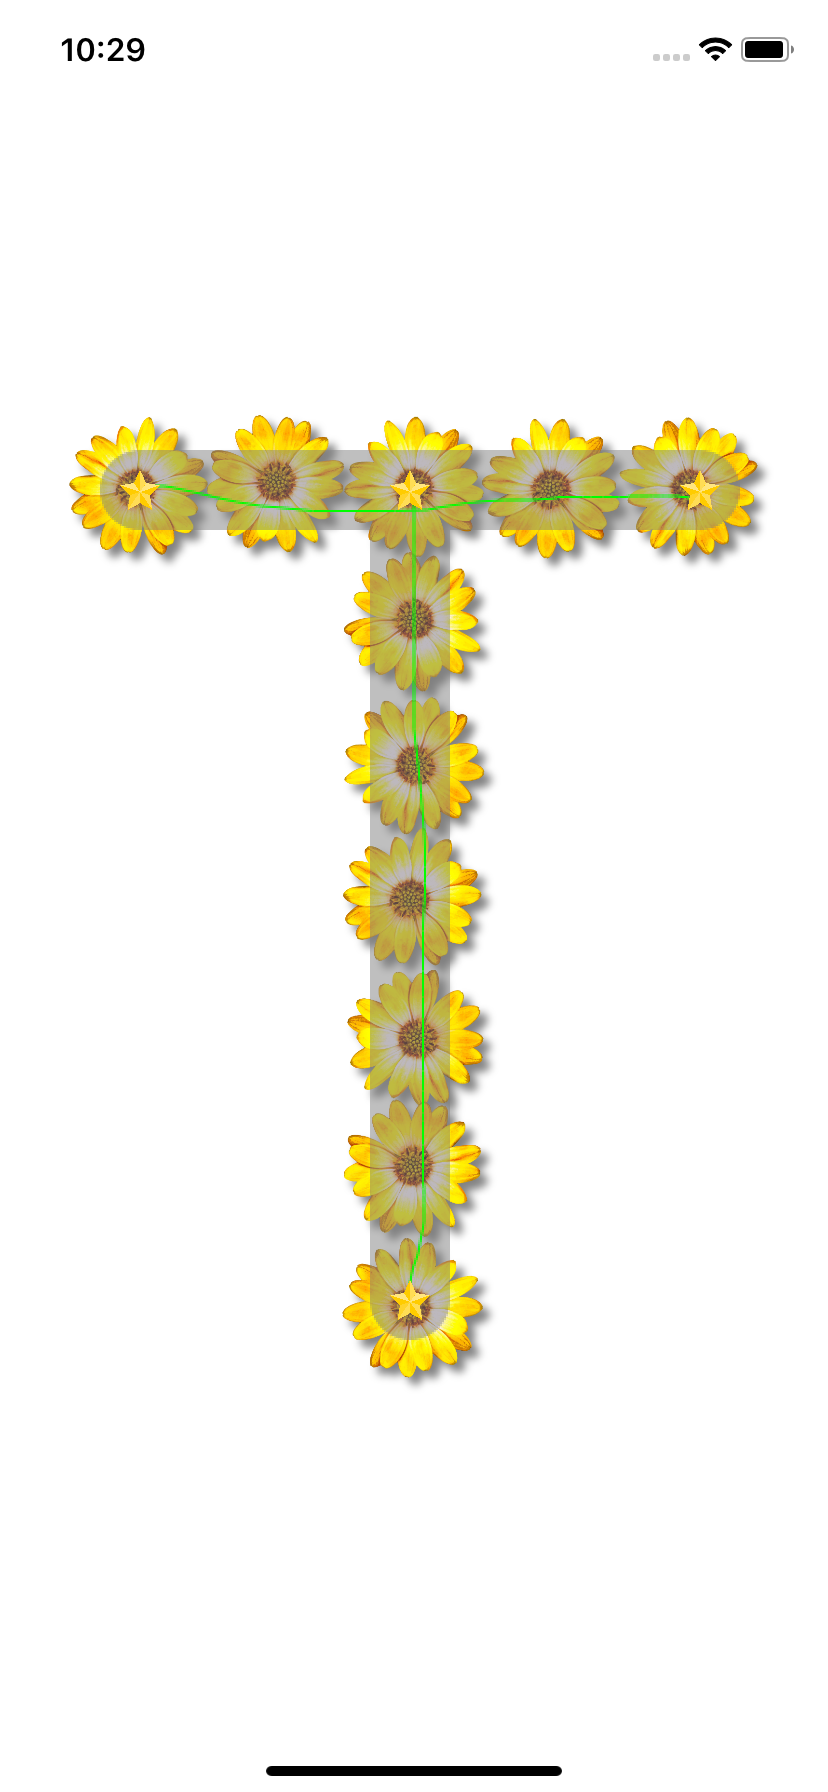
- Firstly, things would look a lot better with some nice image outlining the path we have to trace, like a big letter T (we pick T because it is easy to path).
- Secondly, when we specify a path and threshold, we want the view to figure out waypoints between the given path so that the distance between any two points is less than the threshold. This will ensure that the red lines we generate are what we’d expect.
We add a T made of flowers, centered in the window to make things look a bit better. Note that although the image is aspect fit, that’s a problem since we’ll have to scale the path accordingly. Until we do that, it is better to fix the dimensions of the image.
To add waypoints, we use a recursive method. We take the points of a line segment and calculate the distance between them. If the distance between them is larger than the threshold, we find the midpoint. This point will be added to the expected path. We then find any waypoints that need to be added between the start and midpoint, and midpoint and end. In this way, we recursively add points until we have enough points to cover the distance.
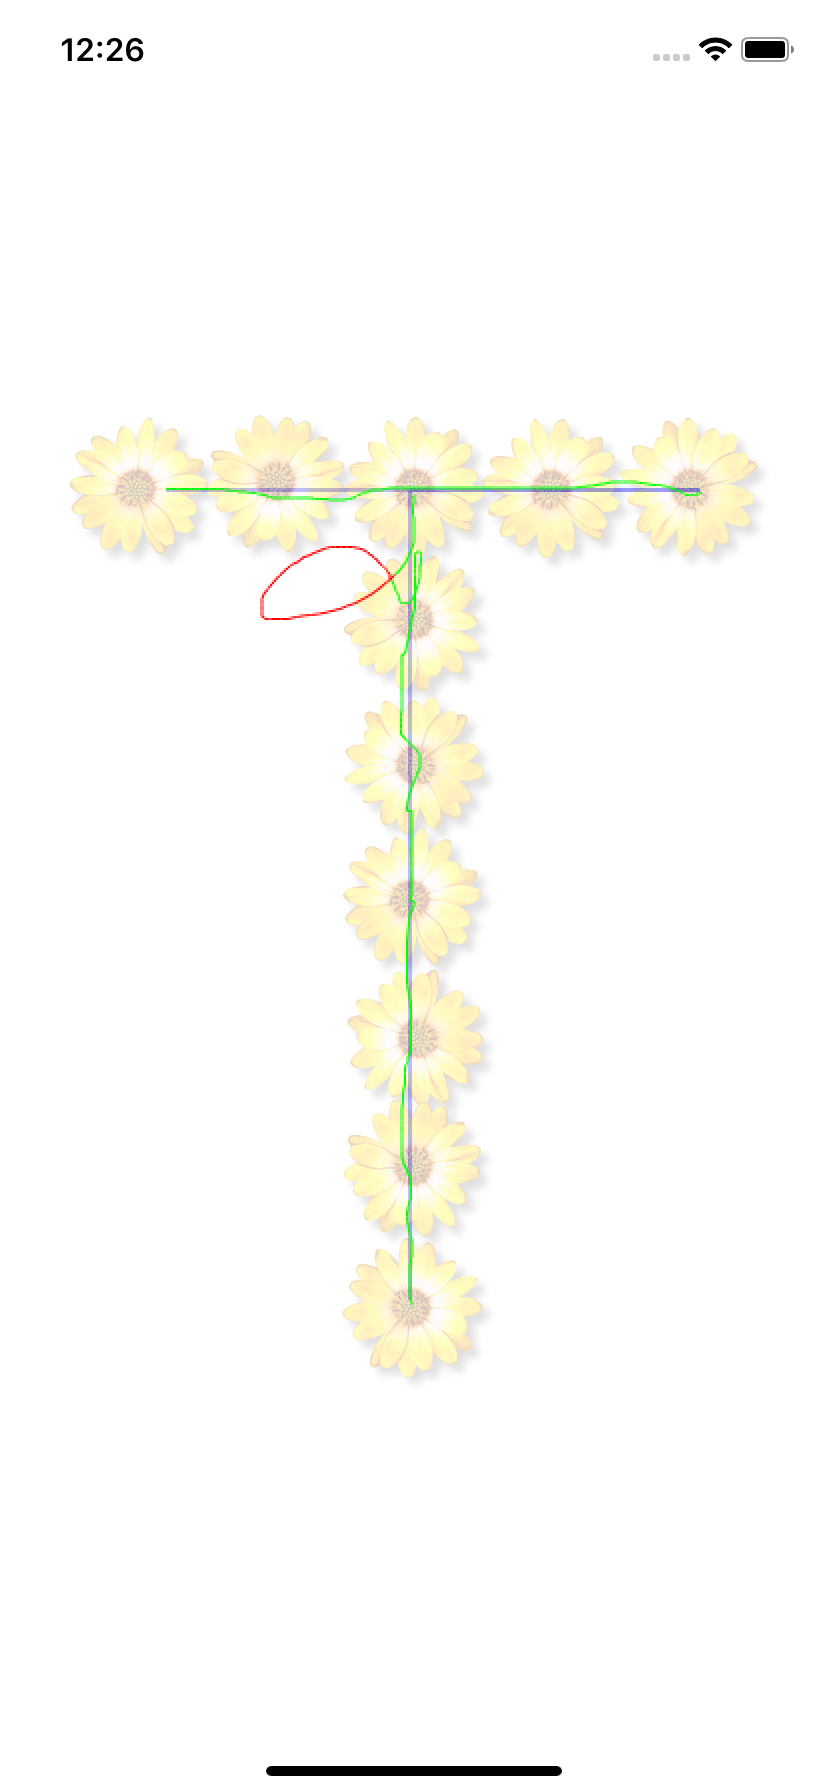
Indicating Success
We need to know when we have completed tracing the figure. We will define this as having a point close to each of the points in the expected path (with waypoints). We’ll use the same threshold for error as described above. When we complete tracing the figure, we will change the color of the drawn line to green.
public override func draw(_ rect: CGRect) {
    let overrideColor = isComplete ? UIColor.green.cgColor : nil
    // elided
    lines.forEach {
        drawLine(context: context, line: $0, overrideColor: overrideColor)
    }
    // elided
}
Although we don’t need to implement smooth curves to make this usable, it would be nice to support multiple paths, in order to support disconnected paths. We will do that by taking a list of expected paths instead of just a single path.
private var _expectedPaths: Array<Path> = []
private var _expectedPathsWithWaypoints: Array<Path> = []
private var pendingPoints: Array<CGPoint> = []
private var isComplete: Bool { return pendingPoints.isEmpty }
// elided
public var expectedPaths: Array<Path> {
    set {
        _expectedPaths = newValue
        _expectedPathsWithWaypoints = // elided
        pendingPoints = // the points of all the paths with waypoints
        // elided
    }
}
public override func touchesMoved(_ touches: Set<UITouch>, with event: UIEvent?) {
    touches.forEach {
        // elided
        removeFromPending(pt: start)
        removeFromPending(pt: end)
    }
    // elided
}
private func removeFromPending(pt: CGPoint) {
    // elided, remove pending point if passed point is close to it
}
This is all working pretty well. One last visual thing we’ll implement to make things look better is we’ll draw the expected path with a wide stroke twice the error threshold. This will add a nice visual indicator of where we are allowed to make mistakes.
context.setLineWidth(maxDistance * 2)
context.setLineCap(.round)
context.setStrokeColor(UIColor.gray.cgColor)
We’ll also add stars at key points in the path that show the points we need to
pass through. We accept some image to be the image we display at each path
point. When given the image, we create UIImageView subviews placed at each
point, sized using the maxDistance variable and centered at the point. If the
image is nil‘ed, we remove each UIImageView from the view and empty the array
of references.
var keyPointImage: UIImage? {
    get { return _keyPointImage }
    set {
        _keyPointImage = newValue
        guard let image = newValue else {
            imageViews.forEach{$0.removeFromSuperview()}
            imageViews = []
            return
        }

        let imageSize = CGSize(width: maxDistance, height: maxDistance)
        let offset = maxDistance / 2.0

        _expectedPaths.compactMap{$0.points}.joined().forEach { pt in
            let imageView = UIImageView(image: image)
            addSubview(imageView)
            let offsetPt = CGPoint(x: pt.x - offset, y: pt.y - offset)
            imageView.frame = CGRect(origin: offsetPt, size: imageSize)
        }
    }
}
Unit Testing
We have created something quite usable and the code is clean enough that it
can be augmented; however, we did a bunch of refactoring in the last step
and things are more messy than they were. Since code tends towards entropy,
we want to make sure what we’ve done is protected against future mistakes by
creating some tests. Although most of what we’ve done is visual, and uses
built-in parts of Cocoa Touch, we can cover it with tests by isolating the
changes we make and testing them. Let’s start first with the code that we used
to place the stars. The code is mostly straightforward, but we can certainly
test that given a point and maxDistance, we return the expected frame
(CGRect).
We separate the code above that creates UIImageViews and sets their frame
into two separate parts.
let frames = _expectedPaths.compactMap{$0.points}.joined().map { pt -> CGRect in
    let offsetPt = CGPoint(x: pt.x - offset, y: pt.y - offset)
    return CGRect(origin: offsetPt, size: imageSize)
}

frames.forEach {
    let imageView = UIImageView(image: image)
    imageView.frame = $0
    addSubview(imageView)
}
Now, we can easily extract a method that calculates a frame from a point and
max distance. We make it public static so that we can call it from the test without
instantiating the TracerView.
// elided code
    let frames = _expectedPaths.compactMap{$0.points}.joined().map {
        TraceView.getFrameFrom(maxDistance: maxDistance, andPt: $0)
    }
// elided code

public static func getFrameFrom(maxDistance: CGFloat, andPt pt: CGPoint) -> CGRect {
    let imageSize = CGSize(width: maxDistance, height: maxDistance)
    let offset = maxDistance / 2.0
    let offsetPt = CGPoint(x: pt.x - offset, y: pt.y - offset)
    return CGRect(origin: offsetPt, size: imageSize)
}
Then we can add our first test:
class TracerTests: XCTestCase {
    func testGetFrame() {
        let rect = TraceView.getFrameFrom(
            maxDistance: 10, andPt: CGPoint(x: 100, y: 300))
        XCTAssertEqual(rect, CGRect(x: 95, y: 295, width: 10, height: 10),
            "The rects should be equal")
    }
}
calculateWayPoints is even easier to test because it doesn’t make use of
any member variables. We can just declare it and all of the methods it calls
as static, then create a test for it.
func testCalculateWaypoints() {
    let points = TraceView.calculateWaypoints(maxDistance: 10,
        start: CGPoint(x: 0, y: 0), end: CGPoint(x: 20, y: 20))
    XCTAssertEqual(points, [
        CGPoint(x: 5, y: 5),
        CGPoint(x: 10, y: 10),
        CGPoint(x: 15, y: 15)
        ], "waypoints should be the same")
}
Since I know that the method works, an easy way to implement the tests is to
just run the method with some logical input, then write a failing
XCTAssertEqual. The console will note the actual value, and I can just add
that into the test if it makes sense. This way of testing is not bulletproof.
There are edge cases that we will miss, but at least we can guard against
regressions in the future.
Dependency Management
One of the best ways to test edge cases is using property-based testing, which relies on the testing system to generate test cases. We can do just that with by using a QuickCheck-like library. In order to import it, we will setup our project with Cocoapods for dependency management. See the notes for more about Cocoapods and some of the tools that follow3.
We make sure bundler, the Ruby package manager, is
installed using the gem command2.
sudo gem install bundler
We create a Gemfile in order to install the cocoapods gem.
# Gemfile
source "https://rubygems.org"
gem 'cocoapods'
Then we install the cocoapods gem using Bundler, and create a new Podfile,
where we can define our iOS dependencies.
bundle install
bundle exec pod init
We add SwiftCheck to the tests target block of our new Podfile.
# Podfile
# elided
target 'TracerTests' do
  inherit! :search_paths
  pod 'SwiftCheck'
end
# elided
Then run bundle exec pod install to install the SwiftCheck dependency. Upon
executing that command, Cocoapods will create an xcproject to build the
dependencies into a framework that is included in your original project. It
packages this project along with our original project in a new workspace file
called Tracer.xcworkspace. From now on, we’ll use the workspace to build our
project since we’re relying on the Cocoapods-managed dependencies.
Property-based Testing
SwiftCheck is a QuickCheck-like
library for Swift. We will write a property-based test that will test the
following:
- For all max distances at least 1, and
- Starting points with positive x and y, and
- Ending points with positive x and y
- Generate waypoints that are less than the max distance apart
SwiftCheck is smart enough to test edge cases, like what happens when the
max distance is 1 or the maximum CGFloat, or when both the starting and
ending point are (0, 0). Here’s how we will define the test:
func testWaypointDistanceProperty() {
    property("a description")
        // for all combinations of max distance and start and end points
        <- forAll { (maxDistance, start, end) in

        let waypoints = // calculate waypoints

        var previous = start
        // starting with the starting point and the first waypoint,
        // confirm that the distance between each neighboring point is
        // less than the max distance
        return (waypoints + [end]).allSatisfy { current in
            let distance = TraceView.getDistance(start: previous, end: current)
            previous = current
            return distance <= maxDistance
        }
    }
}
In order for this test to run, we have to tell SwiftCheck how to generate
the required data types CGFloat and CGPoint. One way to generate an arbitrary
CGFloat is to map over the existing SwiftCheck-provided generator for Double.
extension CGFloat: Arbitrary {
    public static var arbitrary : Gen<CGFloat> {
        return Double.arbitrary.map{CGFloat($0)}
    }
}
But note that we want max distance to always be at least 1. Although we could
embed this into the Arbitrary4 implementation we have added, we could not use
it as an arbitrary for CGFloats in general. Instead, we apply a predicate to
the Generator5 we just defined and let-bind the result.
let floatsGTE1 = CGFloat.arbitrary.suchThat { $0 >= 1 }
We’ll also need only positive CGFloat instances to create the CGPoints we
need for the test.
let positiveFloats = CGFloat.arbitrary.suchThat { $0 >= 0 }
We’ll let-bind a CGPoint generator by zipping two positiveFloats and
applying the result to the CGPoint constructor.
let positivePoints = Gen<(CGFloat, CGFloat)>.zip(
    positiveFloats, positiveFloats).map(CGPoint.init)
And finally, although there are type signatures that allow passing Gen
instances to forAll, I couldn’t get the type signatures to work out. Intead,
in order to enforce using the exact Gen instances I need, I introduced a
parameter
object.
struct LineAndDistance {
    let maxDistance: CGFloat
    let start: CGPoint
    let end: CGPoint
}
and defined its Arbitrary implementation by zipping the generators above,
and mapping the result using the LineAndDistance default constructor.
extension LineAndDistance : Arbitrary {
    public static var arbitrary : Gen<LineAndDistance> {
        return Gen<(CGFloat, CGPoint, CGPoint)>.zip(
            floatsGTE1,
            positivePoints,
            positivePoints).map(LineAndDistance.init)
    }
}
The final test code becomes:
func testWaypointDistanceProperty() {
    var counter = 0
    property("waypoints are created so that points are not more than max distance apart")
        <- forAll { (args: LineAndDistance) in

        let maxDistance = args.maxDistance
        let start = args.start
        let end = args.end

        let waypoints = TraceView.calculateWaypoints(
            maxDistance: maxDistance, start: start, end: end)

        var previous = start
        return (waypoints + [end]).allSatisfy { current in
            let distance = TraceView.getDistance(start: previous, end: current)
            previous = current
            return distance <= maxDistance
        }
    }
}
Adding Fastlane
It’s great that we can have a little more confidence in our code with these new tests. We want to be able to run our test via command line so that we can implement a CI pipeline, and the command for that is:
xcodebuild -workspace Tracer.xcworkspace \
  -scheme Tracer \
  -sdk iphonesimulator \
  -destination 'platform=iOS Simulator,name=iPhone XR' \
  test
There are two small problems with this.
- It gives us messy build output like 1
- We have to repeat those arguments whenever we want to test
In order to address these issues, we’ll use fastlane scan
to do the testing. First we’ll add the fastlane gem to our Gemfile, then
bundle install, then bundle exec fastlane scan. The command will figure out
how we want to run the tests, and if it doesn’t use the proper defaults,
we can save the settings in a file. This also results in more nicely
formatted output.
[07:14:02]: ▸ 2019-03-21 07:14:02.528 xcodebuild[56939:3115294]  IDETestOperationsObserverDebug: Writing diagnostic log for test session
to:
[07:14:02]: ▸ /Users/jly/Library/Developer/Xcode/DerivedData/Tracer-bxjzmxdcrauuvpherayrwqtaedvd/Logs/Test/Run-Tracer-2019.03.21_07-13-18
--0400.xcresult/2_Test/Diagnostics/TracerTests-238BE08F-B889-4811-9774-DD6E49600588/TracerTests-13341B9C-FF27-40F8-92CB-FEEB663A6721/Sess
ion-TracerTests-2019-03-21_071402-wfPSuG.log
[07:14:02]: ▸ 2019-03-21 07:14:02.528 xcodebuild[56939:3112940] [MT] IDETestOperationsObserverDebug: (A66F349B-071E-4093-A9F3-D4451530DE8
1) Beginning test session TracerTests-A66F349B-071E-4093-A9F3-D4451530DE81 at 2019-03-21 07:14:02.529 with Xcode 10B61 on target <DVTiPho
neSimulator: 0x7fbf1b941240> {
[07:14:02]: ▸ SimDevice: iPhone 5s (CCAC9692-E629-4EDE-815C-9D99DEAA8E96, iOS 12.1, Booted)
[07:14:02]: ▸ } (12.1 (16B91))
[07:14:06]: ▸ All tests
[07:14:06]: ▸ Test Suite TracerTests.xctest started
[07:14:06]: ▸ TracerTests
[07:14:06]: ▸ ✓ testCalculateWaypoints (0.002 seconds)
[07:14:06]: ▸ ✓ testGetFrame (0.000 seconds)
[07:14:06]: ▸ ✓ testWaypointDistanceProperty (0.035 seconds)
[07:14:06]: ▸    Executed 3 tests, with 0 failures (0 unexpected) in 0.038 (0.041) seconds
Continuous Integration (CI)
Now that we have a relatively simple way of running tests, we can setup CI for our project. CI is useful in making sure that our code is always working, by running tests each time we check in our code.
If you have your own hardware, such as a spare Mac lying around, you can setup something opensource such as Jenkins or Gitlab to kick off the build, setting up the spare Mac as a job runner. If you’d rather not go through the trouble of setting up your own CI pipeline, there are a number of service providers that offer CI services and macOS build agents. We’ll try to add our repository to two different CI services.
First, CircleCI is one of the most popular hosted CI providers right now. It works via a declarative yaml file that has various shortcuts that make it simple to read and build projects, but also allows you to run arbitrary commands. They offer a free trial to get started. We can add support for CircleCI by adding the following yaml file to our project.
# .circleci/config.yml
version: 2
jobs:
  build-and-test:
    macos:
      xcode: "10.1.0"
    shell: /bin/bash --login -o pipefail
    steps:
      - checkout
      - run:
          name: Install required Ruby gems
          command: bundle install
      - run:
          name: Install CocoaPods
          command: bundle exec fastlane run cocoapods
      - run:
          name: Build and run tests
          command: bundle exec fastlane scan
workflows:
  version: 2
  build-and-test:
    jobs:
      - build-and-test
Once we have added and committed this file to our repository, and linked our repository with CircleCI via their web interface, it will start to build. The output looks like this:
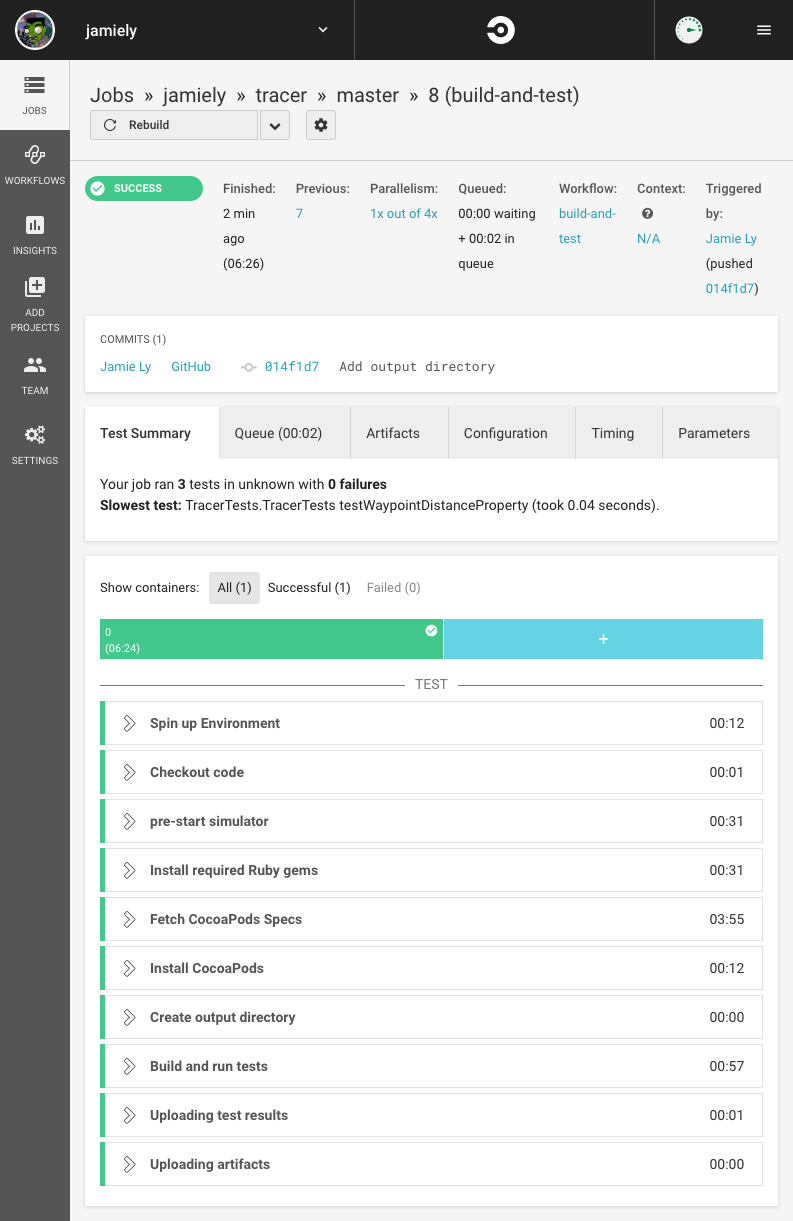
CircleCI will build the project whenever a commit is pushed to master.
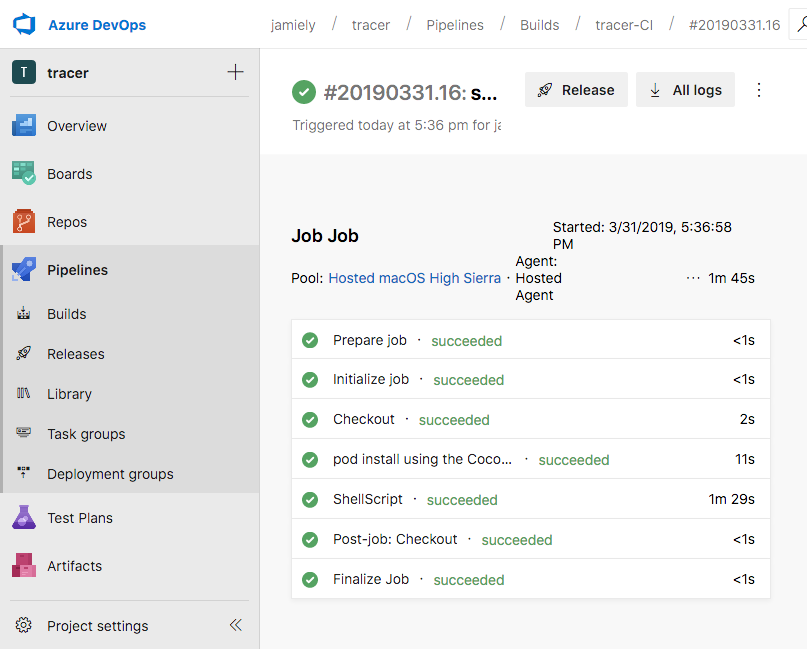
If you have trouble getting on CircleCI’s free plan like I did, Azure DevOps is another option that supports free macOS pipelines and is easy to get started with.
We can get started by defining a yaml file in our project containing a definition of the image we will use and the build steps. Azure DevOps allows us to choose which yaml file defines our build, so the name doesn’t matter.
# .azure-pipelines/main.yml
pool:
  vmImage: 'macOS-10.13'
steps:
  - task: CocoaPods@0
    displayName: 'pod install using the CocoaPods task with defaults'
  - task: ShellScript@2
    inputs:
      scriptPath: .azure-pipelines/test
Although Azure DevOps does support a task that will test an XCode project,
and even allow you to test on real devices,
I didn’t want to make the testing step much different than what we already have.
So, I run a shell script in the pipeline that runs fastlane scan.
# .azure-pipelines/test

# When this script gets run, the context will be the
# script directory, so we cd into the root directory
cd ..
bundle update --bundler
bundle install
# This step is new. Since there are multiple XCode
# versions on their macOS image, we have to specify
# which one we want to use
export DEVELOPER_DIR="/Applications/Xcode_10.1.app"
bundle exec fastlane scan --output_directory output/scan
The pipeline run looks like this:
Framework Distribution
We just added Cocoapods in order to add and maintain dependencies
in our project. Wouldn’t it be nice if we could distribute this project as a
Cocoapod so that it was easy for people to use? If we want to do this, we’ll
have to make several changes:
- Restructure the project to produce a
Cocoa Touch Frameworkproduct. This is a library that can be included into other projects. - Optionally, move the code that shows the view into some sort of “Demo” project.
- Create the necessary files to define our
Cocoapodand publish it to theCocoapodrepository.
First, we will move most of our files into a subdirectory called Demo.
mkdir -p Demo
git mv Tracer Tracer.xcodeproj TracerUITests Demo
cp -r Gemfile* Podfile* Demo
Opening the project from the Demo folder, we’ll use XCode to rename the
project and each of the targets. We’ll postpone further changes until we have
the framework project working. We will create a new project in the root
directory called Tracer. (To do this we wil create the project in a temporary
directory, then copy the files into the root directory.) We’ll choose “Cocoa
Touch Framework” as the template. We’ll move TraceView.swift and
TracerTests from the Demo folder to source folders in the root directory.
We will add a Podfile that installs SwiftCheck, run bundle exec pod
install in the root directory, and open the Tracer.xcworkspace. We’ll make
sure that it builds correctly, then add a Tracer.podspec.
Pod::Spec.new do |s|
  s.name                  = "Tracer"
  s.version               = "0.1.0"
  # elided
  s.ios.deployment_target = "11.0"
  s.source                = { :git => "https://github.com/jamiely/Tracer.git", :tag => "#{s.version}"}
  s.source_files          = "Sources/**/*.swift"
end
Now that we have made a Tracer pod, we’ll finish modifications to the Demo
project. We’ll edit the Podfile to remove unnecessary targets and update the
Podfile to include the Tracer dependency. We use the path argument to
refer to the source files in the root directory.
platform :ios, '11.0'

target 'TracerDemo' do
  # Comment the next line if you're not using Swift and don't want to use dynamic frameworks
  use_frameworks!
  pod 'Tracer', path: '../'
end
We’ll rerun bundle exec pod install to generate Demo.xcworkspace. We may
have to delete some Framworks and Products added by the previous Podfile
targets, and modify the location of the Info.plist file in the Build
Settings. We’ll also have to add an import Tracer to the
ViewController.swift. Compiling, we’ll notice some issues we have to resolve
dealing with visibility of the types. We have to add public to classes,
structs, and some methods to make them visible outside of the framework. We’ll
build and run Demo.xcworkspace to make sure that everything works.
refs/tags/cocoapod-distribution
Next Steps
There are many places we could continue at this point. Since I don’t have a specific use case for the project right now, there’s no clear direction for me to take. One of the very next steps that would probably be needed to make this more usable is to create some delegate protocol that allows further customization of this view’s functionality. For example, we could have delegates that can be used for simple customizations such as:
protocol TracerDelegate {
  /// Returns the color that should be used for the passed line
  func colorForLine(line: Line) -> UIColor
  /// Controls whether lines should be shown
  func shouldDrawLine(line: Line) -> Bool
}
or a delegate that can be used to customize everything:
protocol TracerDelegate {
  /// Customize how lines are drawn
  func drawLine(context: CGContext, line: Line, overrideColor: CGColor?,
                forView view: TracerView)

  /// Customize the drawing of expected paths
  func drawExpectedPaths(paths: Array<Path>, forView view: TracerView)
}
Conclusion
In this article, we started with a concept and implemented that idea piece by
piece into something that works. There’s a lot more we can do with this idea,
so feel free to fork the project. We implemented unit tests, and a
property-based test using SwiftCheck. We saw how to manage dependencies
using Cocoapods. We made test runs more straightforward using fastlane
and setup CI with two hosted solutions. Finally, we saw how to package our
own Framework as a Cocoapod.
The source code for this project is available on
GitHub, and you can add this Cocoapod
to your own project by including this in your Podfile.
pod 'Tracer', :git => 'https://github.com/jamiely/Tracer.git'
Notes
1 1:
/usr/bin/codesign -r- --display /Users/jamie/Library/Developer/Xcode/DerivedData/Tracer-bxjzmxdcrauuvpherayrwqtaedvd/Build/Products/Debug-i
phonesimulator/Tracer.app/PlugIns/TracerTests.xctest/Frameworks/libswiftFoundation.dylib
Code signature of /Users/jamie/Library/Developer/Xcode/DerivedData/Tracer-bxjzmxdcrauuvpherayrwqtaedvd/Build/Products/Debug-iphonesimulator
/Tracer.app/PlugIns/TracerTests.xctest/Frameworks/libswiftDispatch.dylib is unchanged; keeping original
Code signature of /Users/jamie/Library/Developer/Xcode/DerivedData/Tracer-bxjzmxdcrauuvpherayrwqtaedvd/Build/Products/Debug-iphonesimulator
/Tracer.app/PlugIns/TracerTests.xctest/Frameworks/libswiftObjectiveC.dylib is unchanged; keeping original
Code signature of /Users/jamie/Library/Developer/Xcode/DerivedData/Tracer-bxjzmxdcrauuvphera
Object:   <IDESchemeActionTestAttachment: 0x7fa5853bc3f0>
Method:   -_savePayload:
Thread:   <NSThread: 0x7fa58510b4b0>{number = 1, name = main}
Please file a bug at https://bugreport.apple.com with this warning message and any useful information you can provide.
    t =     4.93s Tear Down
Test Case '-[TracerUITests.TracerUITests testExample]' passed (5.128 seconds).
Test Suite 'TracerUITests' passed at 2019-03-21 06:56:28.103.
         Executed 1 test, with 0 failures (0 unexpected) in 5.128 (5.129) seconds
Test Suite 'TracerUITests.xctest' passed at 2019-03-21 06:56:28.104.
         Executed 1 test, with 0 failures (0 unexpected) in 5.128 (5.131) seconds
Test Suite 'All tests' passed at 2019-03-21 06:56:28.105.
         Executed 1 test, with 0 failures (0 unexpected) in 5.128 (5.133) seconds
2 1: Assuming we are using System ruby, that is, the ruby that comes with an install of macOS.
3 1:
Bundler
We use bundler to manage ruby dependencies called gems. Cocoapods is a ruby
gem that is itself an iOS dependency manager. So, we use bundler to make sure
all the contributors to the Tracer project are using the same version of
Cocoapods. In practice, I’ve never run into an issue where someone using a
different version of Cocoapods than I was caused an issue.
Cocoapods
Cocoapods is one of a few possibilities for managing dependencies. There’s
also manual management, which will work decently until you want to upgrade
libraries or track the version you are using. There’s
Carthage which is less invasive than
Cocoapods. And although it doesn’t seem pratical to use yet (at least for iOS
projects), there is Swift Package
Manager.
One thing I like about Cocoapods is that there is a catalogue of pods that
is searchable. In practice, this often yields out of date and unused pods. I
often just wind up performing a web search for a library I want, and checking
if there is a Cocoapod spec.
Fastlane
Although we just use Fastlane here for testing, it is the swiss army knife of iOS build automation. Check it out if you do anything iOS build related.
/// A type that implements random generation and shrinking of values.
///
/// While testing, SwiftCheck will invoke `arbitrary` a given amount of times
/// (usually 100 if the default settings are used).  During that time, the
/// callee has an opportunity to call through to any data or sources of
/// randomness it needs to return what it deems an "Arbitrary" value.
///
/// Shrinking is reduction in the complexity of a tested value to remove noise
/// and present a minimal counterexample when a property fails.  A shrink
/// necessitates returning a list of all possible "smaller" values for
/// SwiftCheck to run through.  As long as each individual value in the returned
/// list is less than or equal to the size of the input value, and is not a
/// duplicate of the input value, a minimal case should be reached fairly
/// efficiently. Shrinking is an optional extension of normal testing.  If no
/// implementation of `shrink` is provided, SwiftCheck will default to an empty
/// one - that is, no shrinking will occur.
///
/// As an example, take `Array`'s implementation of shrink:
///
///     Arbitrary.shrink([1, 2, 3])
///        > [[], [2,3], [1,3], [1,2], [0,2,3], [1,0,3], [1,1,3], [1,2,0], [1,2,2]]
///
/// SwiftCheck will search each case forward, one-by-one, and continue shrinking
/// until it has reached a case it deems minimal enough to present.
///
/// SwiftCheck implements a number of generators for common Swift Standard
/// Library types for convenience.  If more fine-grained testing is required see
/// `Modifiers.swift` for an example of how to define a "Modifier" type to
/// implement it.
public protocol Arbitrary {
	/// The generator for this particular type.
	///
	/// This function should call out to any sources of randomness or state
	/// necessary to generate values.  It should not, however, be written as a
	/// deterministic function.  If such a generator is needed, combinators are
	/// provided in `Gen.swift`.
	static var arbitrary : Gen<Self> { get }

	/// An optional shrinking function.  If this function goes unimplemented, it
	/// is the same as returning the empty list.
	///
	/// Shrunken values must be less than or equal to the "size" of the original
	/// type but never the same as the value provided to this function (or a loop
	/// will form in the shrinker).  It is recommended that they be presented
	/// smallest to largest to speed up the overall shrinking process.
	static func shrink(_ : Self) -> [Self]
}
//
//  Gen.swift
//  SwiftCheck
//
//  Created by Robert Widmann on 7/31/14.
//  Copyright (c) 2015 TypeLift. All rights reserved.
//
/// `Gen` represents a generator for random arbitrary values of type `A`.
///
/// `Gen` wraps a function that, when given a random number generator and a
/// size, can be used to control the distribution of resultant values.  A
/// generator relies on its size to help control aspects like the length of
/// generated arrays and the magnitude of integral values.
public struct Gen<A> {